现在就让我们看一下到底是怎么进入保护模式。
- void go_to_protected_mode(void)
-
{
-
/* Hook before leaving real mode, also disables interrupts */
-
realmode_switch_hook();
-
-
/* Enable the A20 gate */
-
if (enable_a20()) {
-
puts("A20 gate not responding, unable to boot...\n");
-
die();
-
}
-
-
/* Reset coprocessor (IGNNE#) */
-
reset_coprocessor();
-
-
/* Mask all interrupts in the PIC */
-
mask_all_interrupts();
-
-
/* Actual transition to protected mode... */
-
setup_idt();
-
setup_gdt();
-
protected_mode_jump(boot_params.hdr.code32_start,
-
(u32)&boot_params + (ds() << 4));
-
}
1. 首先需要执行由bootloader指定的hook。
- /*
-
* Invoke the realmode switch hook if present; otherwise
-
* disable all interrupts.
-
*/
-
static void realmode_switch_hook(void)
-
{
-
if (boot_params.hdr.realmode_swtch) {
-
asm volatile("lcallw *%0"
-
: : "m" (boot_params.hdr.realmode_swtch) //hook由bootloader指定,并不是所有bootloader都会指定hook。详细的可以参见Documentation/x86/boot.txt里的Advanced Boot Loader Hooks
-
: "eax", "ebx", "ecx", "edx");
-
} else {
-
asm volatile("cli");
-
outb(0x80, 0x70); /* Disable NMI */ //NMI的具体介绍可以参见http://wiki.osdev.org/Non_Maskable_Interrupt
-
io_delay();
-
}
-
}
2. 然后就需要把A20打开。A20是x86系统里的第21根地址线,它存在于80286以后的CPU。打开A20就能在实模式下访问最大至16M的地址空间。CPU进入保护模式必须把A20打开。
3. reset_coprocessor(),显然就是重置协处理器。实际是向0xf0和0xf1都写入0。没有查到0xf0和0xf1具体的定义。不好多说些什么。
4. mask_all_interrupts(),很显然,由于马上要进入保护模式了,一切的中断都屏蔽掉。
5. setup_idt(),将idt初始化为0。即当前不使用IDT.
6. setup_gdt(),将初始化GDT和GDT里面的内容。其代码如下:
- static void setup_gdt(void)
-
{
-
/* There are machines which are known to not boot with the GDT
-
being 8-byte unaligned. Intel recommends 16 byte alignment. */
-
static const u64 boot_gdt[] __attribute__((aligned(16))) = {
-
/* CS: code, read/execute, 4 GB, base 0 */
-
[GDT_ENTRY_BOOT_CS] = GDT_ENTRY(0xc09b, 0, 0xfffff),
-
/* DS: data, read/write, 4 GB, base 0 */
-
[GDT_ENTRY_BOOT_DS] = GDT_ENTRY(0xc093, 0, 0xfffff),
-
/* TSS: 32-bit tss, 104 bytes, base 4096 */
-
/* We only have a TSS here to keep Intel VT happy;
-
we don't actually use it for anything. */
-
[GDT_ENTRY_BOOT_TSS] = GDT_ENTRY(0x0089, 4096, 103),
-
};
-
/* Xen HVM incorrectly stores a pointer to the gdt_ptr, instead
-
of the gdt_ptr contents. Thus, make it static so it will
-
stay in memory, at least long enough that we switch to the
-
proper kernel GDT. */
-
static struct gdt_ptr gdt;
-
-
gdt.len = sizeof(boot_gdt)-1;
-
gdt.ptr = (u32)&boot_gdt + (ds() << 4);
-
-
asm volatile("lgdtl %0" : : "m" (gdt));
-
}
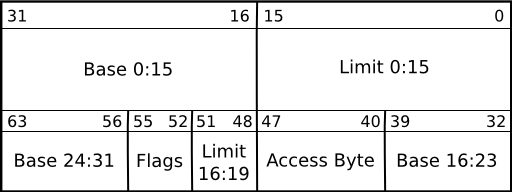
首先我们需要了解的是GDT entry的结构。
GDT_ENTRY的定义如下:
- /* Constructor for a conventional segment GDT (or LDT) entry */
-
/* This is a macro so it can be used in initializers */
-
#define GDT_ENTRY(flags, base, limit) \
-
((((base) & 0xff000000ULL) << (56-24)) | \
-
(((flags) & 0x0000f0ffULL) << 40) | \
-
(((limit) & 0x000f0000ULL) << (48-16)) | \
-
(((base) & 0x00ffffffULL) << 16) | \
-
(((limit) & 0x0000ffffULL)))
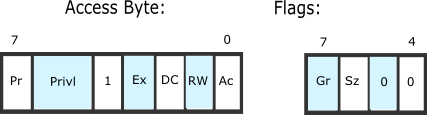
可以清楚得看到,base, limit和flag通过位移和或组成了GDT_ENTRY。其中flags代表了40-47位的access byte和52-55位的flags。
CS和DS的Flags=0xc0, 所以Gr=1(4K为一个页面) Sz=1(该内存段是保护模式下可访问)
CS的Access Byte = 0x9b,意味着Pr=1(合法的Entry Pr必须为1), Privl=0(ring=0)Ex=1(该段可执行),DC=0(该段只能在Privl设定的级别代码访问,这里该段只能在Ring 0下访问),RW=1(该段是代码段,所以RW=1指明该段可读)
DC的Access Byte=0x93,意味着Pr=1(合法的Entry Pr必须为1), Privl=0(ring=0)Ex=0(该段为数据段),DC=0(这是数据段,DC指明该段以低地址段为起点,高地址方向是段地址增长方向)RW=1(该段是数据段,RW=1指明该段为可写)
7. 接下来就跳转到protected_mode_jump(在pmjump.S里)这段汇编代码里面去。传入两个参数。
第一个是参数是hdr.code32_start。这个参数缺省由编译器产生,指向0x100000即1M的位置,kernel的32位保护模式启动代码就在那里。当然bootloader可以改变这个值以指向bootloader的hook,或者bootloader没有把code32_start定位在0x100000的位置。
第二个参数是(u32)&boot_params + (ds() << 4),实际上是把boot_params在实模式下的地址转换到保护模式的地址。因为CS和DS指的都是从0到4G的地址空间,所以这样的转换就足够了。
有一个问题是我们在前面讨论的时候没有涉及到的,那就是bootloader怎么找到32位启动代码的?我们可以看一下arch/x86/boot/Makefile. 我们会发现kernel实际由setup.bin和vmlinux.bin组成。而vmlinux.bin实际上在arch/x86/boot/compressed下面。打开vmlinux.lds.S,你可以看到以下定义
- #ifdef CONFIG_X86_64
-
OUTPUT_ARCH(i386:x86-64)
-
ENTRY(startup_64)
-
#else
-
OUTPUT_ARCH(i386)
-
ENTRY(startup_32) //启动入口是startup_32即code32_start
-
#endif
-
-
SECTIONS
-
{
-
/* Be careful parts of head_64.S assume startup_32 is at
-
* address 0.
-
*/
-
. = 0; //从相对地址0开始,由于bootloader一般会把32位保护模式代码装载到0x100000的位置所以启动的入口就在这里。汇编代码在header_32.S中
-
.head.text : {
-
_head = . ;
-
HEAD_TEXT
-
_ehead = . ;
-
}
-
.rodata..compressed : { //压缩过的kernel代码
-
*(.rodata..compressed)
-
}
-
.text : { //数据段
-
_text = .; /* Text */
-
*(.text)
-
*(.text.*)
-
_etext = . ;
-
}
-
.rodata : {
-
_rodata = . ;
-
*(.rodata) /* read-only data */
-
*(.rodata.*)
-
_erodata = . ;
-
}
-
.got : {
-
_got = .;
-
KEEP(*(.got.plt))
-
KEEP(*(.got))
-
_egot = .;
-
}
-
.data : {
-
_data = . ;
-
*(.data)
-
*(.data.*)
-
_edata = . ;
-
}
-
. = ALIGN(L1_CACHE_BYTES);
-
.bss : {
-
_bss = . ;
-
*(.bss)
-
*(.bss.*)
-
*(COMMON)
-
. = ALIGN(8); /* For convenience during zeroing */
-
_ebss = .;
-
}
-
#ifdef CONFIG_X86_64
-
. = ALIGN(PAGE_SIZE);
-
.pgtable : {
-
_pgtable = . ;
-
*(.pgtable)
-
_epgtable = . ;
-
}
-
#endif
-
_end = .;
-
}
所以bootloader只要找到startup_32就知道哪里是32位保护模式代码了。直接把从startup32开始的kernel文件剩余部分装载进内存就好了。
明天我们将真正地走到保护模式,又一次进入汇编的世界。
阅读(344) | 评论(0) | 转发(0) |